
Give your phone a little extra sparkle with this crystal phone case embellishment. It is a fun, beginner-friendly way to personalise something you use every day, turning a plain case into a statement accessory. This step-by-step guide shows you how to bedazzle a phone case with Serinity flatback rhinestones, whether you want a subtle shimmer or full-on glamour.
The trick to a clean, professional finish is to map out your design before you glue, which is exactly what this method walks you through. Here is everything you need, then the full process.
Project at a glance
- Difficulty: Beginner
- Time: 1 to 2 hours, plus at least 12 hours to cure
- Crystals used: Serinity flatbacks in Provence Lavender, SS16 with SS12 and SS9 to fill
- Best crystal type: Non-hotfix flatbacks, glue-set (never heat-apply hotfix to a plastic case)
Watch the tutorial
See this project come together. Watch the full make below, then scroll down for the kit list and step-by-step instructions.
What you'll need
Quantities suit full coverage of a standard case, so scale them to your case and design. Add the crystals, glue and tools to your cart from the cards below. The picker and trays are reusable across every project, so browse the full range of tools and accessories to build your kit.
- Phone case of your choiceYour base, clean and dry1
- Serinity SS16 Flatbacks, Provence LavenderMain coverage300
- Serinity SS12 Flatbacks, Provence LavenderFilling gaps50
- Serinity SS9 Flatbacks, Provence LavenderFilling smaller gaps50
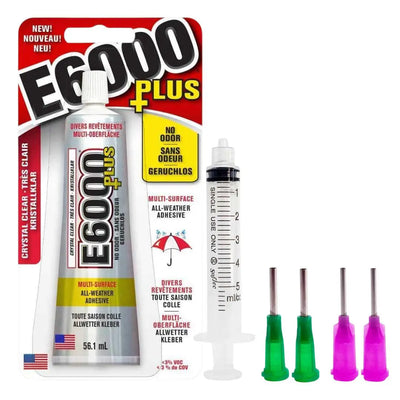
- E6000 Plus Glue KitAdhesive with syringe1
- Wax Crystal Picker ToolPlacing crystals1
- Magic Sorting TrayOrganising sizes3
Shop this project
Everything you need for this build. Quantities are a guide, so adjust to your design.

From £2.12 Excl. VAT

£1.95 Excl. VAT

£5.12 Excl. VAT
£9.53 Excl. VAT
Not sure how many crystals you need? Use our Crystal Calculator to estimate by surface area.
How to bedazzle a phone case
Step 1: Gather your supplies and prepare the glue
Tip your flatbacks into the sorting trays so they are easy to reach, and keep the sizes separate. Make sure the tip of your wax picker is sharp, which makes lifting each crystal easier, then load your E6000 glue into the syringe ready to apply.
Step 2: Map out your crystals
Before gluing anything, plan your placement. It sounds simple, but mapping out the design first is the key to a smooth, even finish. For a square case, lay your crystals along the top edge of the case dry, before any glue, so you can see exactly how many fit comfortably across the width and adjust your spacing.
Step 3: Glue and place the crystals
Once your layout is set, apply the E6000 glue a small section at a time. Use the right amount: too much looks messy and can squeeze up around the stones, too little will not hold. Judging this gets easier with practice. Place the SS16 crystals for the bulk of the coverage, lifting each one with the wax picker.
Step 4: Inspect and fill the gaps
Once your main crystals are down, check your work and reposition any stones now, while the glue is still workable. Then fill any gaps the larger crystals could not reach with the smaller sizes, dropping in SS12 and SS9 where needed for a seamless finish.
Step 5: Leave to dry
With everything in place, leave the case to cure for at least 12 hours before using it, so the bond is fully set.
Frequently asked questions
How do you put rhinestones on a phone case?
Map the design out first by laying the crystals dry on the case, then apply a thin layer of E6000 glue a section at a time and press each flatback into place with a wax picker. Set the largest crystals first, fill gaps with smaller sizes, then leave it to cure.
What glue works best for a phone case?
A flexible, industrial-strength adhesive such as E6000. It bonds well to hard plastic cases and flexes with daily handling instead of popping off. Make sure the case is clean and free of grease before you start.
How many crystals do I need for a phone case?
Full coverage of a standard case uses roughly 450 crystals across sizes, with the bulk in SS16 and smaller SS12 and SS9 to fill the gaps. It depends on your case size and design, so use our Crystal Calculator to estimate before you buy.
Will the crystals stay on the phone case?
Yes, with a flexible glue like E6000 and a full cure of at least 12 hours. A phone case is handled constantly and goes in and out of pockets, so press each stone in firmly and keep a few spares to replace any that work loose over time.
Can I bedazzle a silicone or clear case?
Hard plastic cases hold crystals best. Silicone and rubbery cases flex too much and resist most glues, so they are not ideal. On a clear case, lightly scuff the area first so the glue has something to grip, and accept that the backs will show through.
Which crystals should I use?
We used our own Austrian-made Serinity in Provence Lavender here, a soft purple that suits an everyday accessory. You can also use premium Swarovski, Czech-made Preciosa, or budget Estella, and pick any colours that match your style.
Make it your own
Add as many or as few crystals as suits your style, from a scattered sparkle to bold full coverage, and mix colours or sizes to make it your own. For more gadget makes, see our bedazzled Xbox controller project, or for a premium themed take try our Swarovski pearl phone case. You can also explore the full Craft Studio.


