
Animal print is always a statement, and a pair of leopard print champagne flutes turns any toast into an occasion. This guide shows you how to make leopard print champagne flutes using Serinity flatback crystals in Jet and Light Amber, glued onto the glass in clusters that read as a leopard pattern.
The clever shortcut is to slip a printed leopard pattern inside the flute as a guide, so you simply follow the spots through the glass. The method works for any pattern or colourway you fancy, so once you have the technique you can design your own. Here is everything you need, then the full steps.
Project at a glance
- Difficulty: Intermediate, a guided pattern on a curved surface
- Time: A couple of hours for a pair, plus overnight drying
- Crystals used: Serinity non-hotfix flatbacks SS5 in Jet and Light Amber
- Technique: Guided pattern flatback embellishment with resin glue
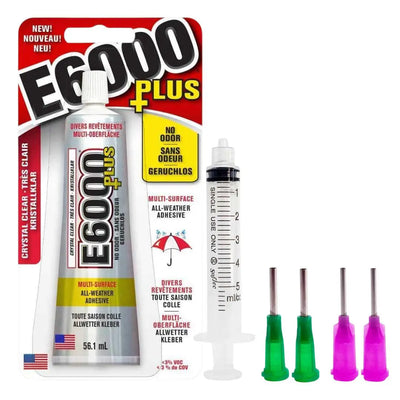
What you'll need
Quantities make a pair of flutes with a generous scatter of spots, so scale to your glasses and how dense you want the print. Add the crystals and glue to your cart from the cards below. The syringe, picker and tray are reusable across every project, so browse the full range of tools and accessories to build your kit.
- Your own champagne flutes, clean and dryYour base; keep crystals below the drinking rim2
- Serinity Non-Hotfix Flatbacks SS5, Light AmberThe leopard spots1440
- Serinity Non-Hotfix Flatbacks SS5, JetOutlining the spots1440
- E6000 Plus GlueBonding the crystals to glass, dries clear1
- Crystal FX SyringeDrawing thin, controlled glue lines1
- Wax Crystal Picker ToolPicking and placing1
- Magic Sorting TrayHolding both colours while you work1
Shop this project
Everything you need for this build. Quantities are a guide, so adjust to your design.

From £2.12 Excl. VAT

From £2.46 Excl. VAT

£1.95 Excl. VAT
£9.53 Excl. VAT
Not sure how many crystals you need? Use our Crystal Calculator to estimate by surface area.
How to make leopard print champagne flutes
Step 1: Clean the flutes
Make sure the champagne flutes are completely clean and dry, with no grease or dust, so the glue bonds well to the glass.
Step 2: Fill the glue syringe
Place the open end of the Crystal FX syringe inside the nozzle of the E6000 Plus tube and pull the plunger while gently squeezing the tube. This transfers the glue with minimal mess and air exposure. Only load as much as you need.
Step 3: Remove air bubbles
Hold the syringe upright so any air bubble floats to the top, then gently push the plunger until only glue remains. Attach the needle tip and the syringe is ready.
Step 4: Add a pattern guide
For an easy guide, print a leopard pattern onto paper and slot it inside the flute. You can then follow the spots through the glass as you work, which keeps the print even without drawing on the glass itself.
Step 5: Draw the design in glue
Squeeze a thin layer of glue onto the glass, drawing out the spots from your guide, and leave it 5 to 10 minutes to turn tacky. Keep it thin so it cannot run, and work in small sections on the curved surface so you never touch wet glue while turning the flute.
Step 6: Place the crystals
Use the wax picker tool to place the Light Amber and Jet crystals into clusters that follow the guide, with Light Amber centres broken up by Jet to mimic leopard markings. Keep the crystals close together with as few gaps as possible for the best effect.
Step 7: Dry and finish
Tidy up the edges and leave the flutes to dry overnight. Once the glue is fully cured, remove the paper guide from inside the glass and your leopard print flutes are ready to raise.
Frequently asked questions
How do you make leopard print champagne flutes?
Clean the glass, then slip a printed leopard pattern inside the flute as a guide. Draw the spots in a thin layer of resin glue, let it turn tacky, and place flatback crystals in clusters following the guide, using a dark colour to break up a lighter centre. Dry overnight, then remove the guide.
How do you rhinestone glass?
Make sure the glass is spotlessly clean, then apply a flexible clear-drying glue such as E6000 Plus in thin layers through a fine syringe tip. Let it turn tacky before placing each crystal, work in small sections on curves, and leave it to cure overnight for a lasting bond on the smooth surface.
How do you create a leopard print pattern with crystals?
Leopard print is irregular clusters, not neat rows. Place a centre of Light Amber crystals, then partly outline each cluster with Jet to suggest the dark markings, leaving gaps so it looks organic. A printed guide inside the glass keeps the spacing natural across both flutes.
How many crystals do you need for champagne flutes?
A bold pair like ours used around 1440 of each colour in SS5. A lighter scatter of spots needs far fewer. Coverage depends on glass size and how dense your print is, so use the Crystal Calculator on our website to estimate quantities by area before you buy.
Are the flutes still usable and washable?
Yes, as decorative glasses. Keep the crystals well below the rim so nothing touches your lips, and hand wash gently rather than using a dishwasher or soaking, as prolonged water and heat can loosen the glue over time. Treated with care, the design lasts for many celebrations.
Can I use different colours or patterns?
Absolutely. The guide-and-glue method works for any motif, from zebra stripes to monograms or snowflakes, and Serinity flatbacks come in dozens of shades. Swap Jet and Light Amber for any palette, or scale the spots up with larger crystals for a bolder, faster finish.
Make it your own
Leopard is just the start: try other animal prints, initials for a wedding top table, or a colour theme to match your party. The same glass method scales up beautifully. For more celebration makes, see how to crystallise a prosecco bottle or a set of Mr & Mrs mugs, or explore the full Craft Studio.


