
To make dangle earrings, you thread a bead onto a headpin, roll a loop above it, then link each new headpin through the previous loop until a chain of beads swings from the ear wire. In this tutorial we build a linked daisy chain of six Swarovski crystal beads per earring, faceted globe beads in Crystal AB whose shimmer runs the full length of the drop.
The chain is one simple link repeated, which makes this a reliable best seller for jewellery makers. As an official Authorised Swarovski Distribution Partner, every crystal we supply comes direct from Swarovski in Austria, available to everyone with no minimum order. Here is everything you need, then the full method.
Project at a glance
- Difficulty: Beginner, one link repeated twelve times
- Time: Under an hour for the pair
- Crystals used: Swarovski globe beads 5028/4 in Crystal AB, 6mm
- Technique: Linked headpin chain with evenly spaced loops
What you'll need
Quantities make one pair with six links per earring. Add the beads, findings and tools to your cart from the cards below. The pliers and cutters are reusable across every project, so browse the full range of tools and accessories to build your kit.
- Swarovski Globe Beads 5028/4 6mm, Crystal ABSix per earring chain12
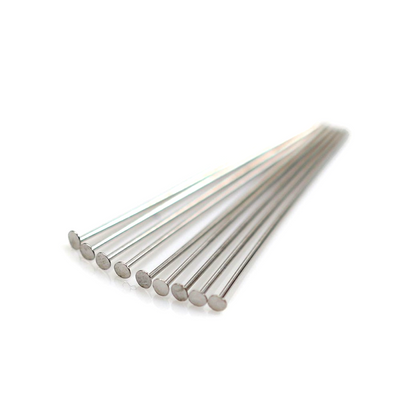
- Silver Plated Flat End Headpins 1 inchOne per link12
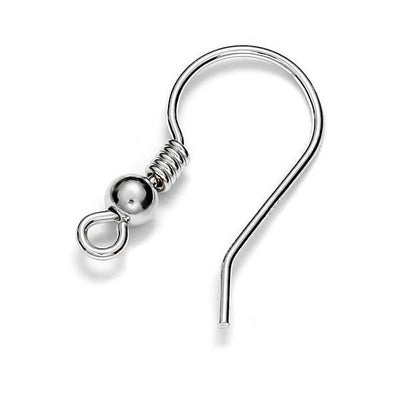
- Silver Plated Fish Hook Ear WiresThe earring hooks2
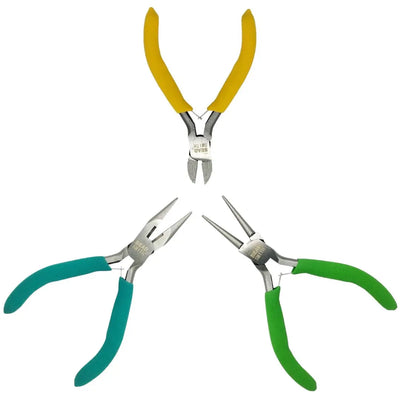
- Chain Nose PliersThe right-angle bends1
- Round Nose PliersRolling the loops1
- Side CuttersTrimming the wire1
Shop this project
Everything you need for this build. Quantities are a guide, so adjust to your design.

Not sure how many crystals you need? Use our Crystal Calculator to estimate by surface area.
How to make dangle earrings
Step 1: Thread the first bead
The headpins form the links of the chain, with the flat head stopping each bead sliding off the bottom. Begin by threading one globe bead onto a headpin.
Step 2: Secure the bead and roll a loop
Use the chain nose pliers to bend the headpin at a right angle 5mm above the bead, locking it in place. Then roll the wire back on itself around the round nose pliers into a small circle and trim the excess with the side cutters, leaving a closed loop similar to a jump ring. This completes a single link, and on its own the beaded element works as a charm or pendant, ready for an earring, necklace or charm bracelet.
Step 3: Create the next link
Repeat Step 1 with a fresh headpin, but before forming its loop, thread the pin through the loop of the previous link. Bend and roll as before, keeping the same 5mm gap, and you have the first true linked section of the chain:

Step 4: Build the chain to six beads
Repeat Step 3 until six beads hang linked together. Keep the gap between bead and loop identical on every link so the chain distributes evenly: mark where the headpin sits on your pliers and hold it there for every bend. We held the wire 5mm in from the tip of the chain nose pliers each time.
Step 5: Attach the ear wire
Using the round nose and chain nose pliers together, gently twist open the loop at the bottom of the fish hook ear wire and thread on the last loop of the chain. Always twist loops open and closed rather than pulling them apart, which weakens the metal and makes the loop likely to break later.
Step 6: Make the matching pair
Repeat steps 1 to 5 for the second earring and the set is complete.
Frequently asked questions
How do you make dangle earrings?
Thread a bead onto a headpin, bend the wire at a right angle 5mm above it and roll a small loop, then build a chain by threading each new headpin through the previous link's loop before forming its own. Link six beads, hang the chain from an ear wire, and repeat for the matching pair.
How do you link beads into a chain?
Each link is a bead on its own headpin with a loop at the top. To connect them, thread the next headpin through the previous link's loop before you bend and roll its own loop, so every new link captures the one before it. The chain grows one bead at a time, swinging freely at each joint.
How do you keep chain links the same length?
Mark a spot on your pliers and hold the headpin at that exact point for every bend. We held the wire 5mm in from the tip of the chain nose pliers each time, which keeps the gap between bead and loop identical on every link, and that consistency is what makes the finished chain hang evenly.
What are Swarovski globe beads?
A small faceted round bead, article 5028/4, whose cut catches light from every direction as the earring moves. In Crystal AB the clear glass carries the shimmering Aurora Borealis coating, so a simple chain of six reads as a glittering line rather than six separate beads.
Can a single linked bead be used as a charm?
Yes. One bead with its loop is essentially a finished charm or pendant, ready to hang from a chain as a necklace, cluster on a charm bracelet, or drop straight from an ear wire as a minimal stud alternative. The full daisy chain is simply that component repeated and connected.
Make it your own
Crystal AB shimmers with everything, but the linked chain takes any palette: graduate the bead colours along the drop, or shorten to three links for everyday wear. For more quick earring makes, see how to make pearl drop earrings and Christmas tree earrings, or explore the full Craft Studio.


