
A beautifully shaped perfume bottle is too lovely to throw away once it is empty, and a coat of crystals turns it into a permanent ornament. This guide shows you how to rhinestone a perfume bottle using Preciosa flatback crystals in Bermuda Blue, covering the glass so your favourite scent lives on as a piece of aesthetic luxury.
Full coverage of a curved, three-dimensional object is mostly about patience and working in small sections, and the deep blue-green flash of Bermuda Blue makes the finish look far more complex than the method actually is. Here is everything you need, then the full steps.
Project at a glance
- Difficulty: Intermediate, full coverage takes patience on a curved surface
- Time: A few hours of placing, plus overnight drying
- Crystals used: Preciosa non-hotfix flatbacks in Bermuda Blue, SS12
- Technique: Full-coverage flatback embellishment with resin glue
What you'll need
Around 1440 SS12 crystals gave full coverage of the bottle shown, so scale to the size and shape of yours. Add the crystals and glue to your cart from the cards below. The syringe, picker and tray are reusable across every project, so browse the full range of tools and accessories to build your kit.
- Your own perfume bottle, clean and dryYour base; lightly sand shiny glass for full coverage1
- Preciosa Non-Hotfix Flatbacks SS12, Bermuda BlueCovering the glass1440
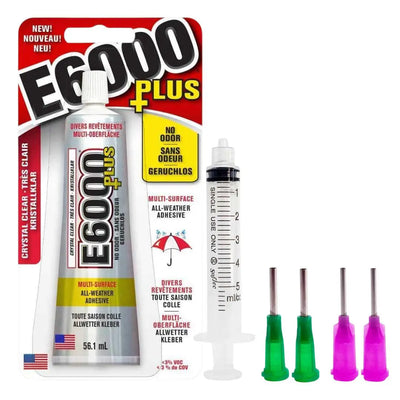
- E6000 Plus GlueBonding the crystals, dries clear1
- Crystal FX SyringeApplying thin, controlled glue lines1
- Wax Crystal Picker ToolPicking and placing1
- Magic Sorting TrayHolding the crystals while you work1
Shop this project
Everything you need for this build. Quantities are a guide, so adjust to your design.

From £4.01 Excl. VAT

£1.95 Excl. VAT

£5.12 Excl. VAT
£9.53 Excl. VAT
Not sure how many crystals you need? Use our Crystal Calculator to estimate by surface area.
How to rhinestone a perfume bottle
Step 1: Prepare the bottle
Make sure the bottle is completely clean and dry. If the glass is shiny and you plan to cover it fully, gently sand the surface to create a rough key, which gives the glue something to grip. You can skip sanding for a scattered or partial design.
Step 2: Fill the glue syringe
Remove the needle tip, place the open end of the syringe inside the nozzle of the E6000 Plus tube, and pull the plunger while gently squeezing the tube. This transfers the glue with minimal mess and air exposure. Only load as much as you need for the session.
Step 3: Remove air bubbles
Hold the syringe upright so any air bubble floats to the top, then gently push the plunger until only glue remains inside. Twist the needle tip back on and the syringe is ready.
Step 4: Apply the glue in sections
Squeeze a thin line of glue onto the glass and leave it 5 to 10 minutes to turn tacky. Do not apply too much, or it will run on the curved surface. Work in small sections on a three-dimensional object so you never touch wet glue while turning the bottle.
Step 5: Place the crystals
Use the wax picker tool to place the Bermuda Blue crystals onto the glue. Following the bottle's contours with undulating concentric lines that flex wider and narrower works beautifully, and it lets a single crystal size hug an irregular shape that would otherwise need three sizes to fit the slopes and corners.
Step 6: Let it dry
Tidy up any stray glue at the edges, then leave the bottle to dry overnight. Once fully cured, your crystallised perfume bottle is ready to display.
Frequently asked questions
How do you rhinestone a perfume bottle?
Clean the bottle and lightly sand shiny glass for full coverage, then pipe a thin line of resin glue, let it turn tacky, and place flatback crystals with a wax picker tool. Work in small sections around the curves, following the bottle's contours, and leave it to dry overnight.
How many crystals do you need to cover a perfume bottle?
Full coverage of the bottle shown took around 1440 SS12 flatbacks, which is one wholesale pack. Bottle size and shape change this a lot, so use the Crystal Calculator on our website to estimate quantities by surface area and stone size before you buy.
What glue works best for crystals on glass?
A flexible, clear-drying resin glue such as E6000 Plus. Sand shiny glass first so the glue can grip, apply it in thin lines through a fine syringe tip so it cannot run on the curves, and let it cure overnight for a bond that holds on a smooth surface.
Can you cover a curved bottle with one crystal size?
Yes. Placing the crystals in undulating concentric lines that flex wider and narrower lets a single size, such as SS12, follow an irregular shape. The flowing lines absorb the slopes and corners that would otherwise force you to switch between three different sizes.
What is Bermuda Blue?
Bermuda Blue is a Preciosa effect colour, a deep teal crystal with a blue-green flash that shifts as the light moves. On genuine Czech-made Preciosa flatbacks it gives a rich, jewel-like finish across the bottle that plain transparent crystals cannot match.
Can I use different colours or objects?
Yes. The same method covers vases, ornaments, trinket boxes and more, and Preciosa flatbacks come in a wide range of colours and effects. Choose a single shade for a sleek look, or blend tones in an ombre to suit the piece you are transforming.
Make it your own
Once you can cover a microphone, the same technique works on stands, headphones or any prop in your setup. Try an ombre, a two-tone spiral, or your initials in a contrast shade. For more coverage makes, see how to bedazzle an Xbox controller or a water bottle, or explore the full Craft Studio.


