
Combine Preciosa Crystals and Pearls into a stunning sun and moon motif brooch by using jewellery making, hand sewing and rhinestone embellishment techniques. Follow the simple step by step instructions below and you will be able to impress your friends and family with your mastery of classic craft skills.
Component List:
The full list of crystals, components and tools needed to complete this project can be found below. If you click on the product description (link), the respective product page will open, where each item can be viewed and added to cart:
|
Component
|
Component Name / Link
|
Quantity
|
 |
x 50 | |
|
|
x 50
|
|
|
|
x 50
|
|
 |
x 1
|
|

|
x 12
|
|
|
|
x 23
|
|
 |
x 41
|
|
|
x 35
|
|
|
x 8
|
|
 |
Gold Plated Crimp Beads |
x 48
|
 |
Gold Plated Flat End Headpins 2 inch |
x 16
|
 |
Silver Plated Bar Brooch Pin |
x 1
|
 |
E6000 Plus Glue |
x 1
|
 |
Wax Crystal Picker Tool |
x 1
|

|
Magic Sorting Tray |
x 1
|
 |
Round Nose Pliers |
x 1
|
 |
Assorted Size 12 Needles |
x 1
|
 |
Scissors |
x 1
|
 |
Golden Yellow Sewing Thread |
x 1
|
 |
Yellow Felt Sheet & Grey Felt Sheet |
x 1 of each
|
 |
Stiff Card Sheet |
x 1
|
Instructions
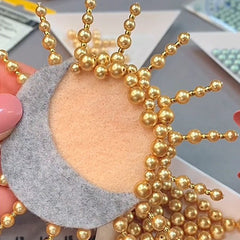
STEP 1
Cut out the shapes
Using the scissors, cut out two circles of the yellow felt that are the same size, these will form the sun, then cut out a crescent moon shape of the grey felt that is the same size as the sun. Finally, cut out a circle of card that is 1cm smaller than the sun, this will reinforce the inside of the brooch.
You should end up with two sun layers, one moon layer and one card layer.
STEP 2
Position the sun beams
Begin by laying the card layer on top of one of the sun layers and then lay out the headpins so that they are evenly spread out around the circle. Using the points on the compass is the best way to establish spacing for example: North, North-north-east, North-east, North-east-east, East, etc.

STEP 3
Build the sun beam
Select a headpin and thread on the pearls and crimp beads in the following pattern:
- 1 x 4mm gold pearl
- 1 x gold crimp bead
- 1 x 4mm gold pearl
- 1 x gold crimp bead
- 1 x 5mm gold pearl
- 1 x gold crimp bead
- 1 x 5mm gold pearl
Step 4
Create a loop on the end
Using the Round Nose Pliers bend a loop at the other end of the headpin, try to leave a space of roughly 1cm between the loop and the pearls.

STEP 5
Repeat steps 3 and 4 for all the sun beams

STEP 6
Glue the layers together
Using the E6000, glue all the layers together in the following sequence:
- Sun layer 1 – This forms the back of the brooch.
- Card layer – This provides reinforcement.
- The looped ends of the headpins – The loops will ensure the headpins stay in position.
- Sun layer 2 – This the sun that will be seen from the front.
- Moon Layer – Make sure the outer edge of the moon matches the suns’ outer edge.

STEP 7
Sew gold pearls on to the sun
First condition your thread by running it through the wax of the Bead Buddy five times as this will strengthen your thread and reduce the risk of getting twisted up while sewing. Then sew the remaining gold pearls onto the visible outer edge of the sun section of the brooch. Try to stay as random as possible when selecting your pearls, while maintaining a general balance in the distribution of the different sizes.
STEP 8
Sew pearls on to the moon
Change over to the pearlescent grey pearls and sew a solid row of the 5mm pearls along the outside of the moon section and then attach an inner row of 4mm pearls, leaving gaps in between each pearl.

STEP 9
Glue on the rhinestones
Use the Magic Sorting Tray to hold the loose crystals while you’re working with them and use the Wax Picker Tool to pick up and place your crystals.
Apply smalls amounts of glue to the surface of the felt and allow a few moments for the glue to become tacky before placing the crystals into your chosen design. We chose the scatter embellishment style for this motif because it can solidly fill irregular shapes easily. There are no rules to follow, simply use whichever crystal fits best in the available space.
STEP 10
Attach the brooch pin
Once all the glue is dry, use the same needle and thread as before to sew the brooch pin onto the back layer of the brooch, so that it runs horizontally across the design. When attaching the pin, ensure the needle is pointing to the right as this will make it easier for most people to operate the clasp.


