Serinity Crystals Gold Briolette Beaded Bracelet Project
Are you a craft lover, jewellery maker, or Etsy shop owner searching for a unique and chic gift idea? Look no further! In this how-to guide, we will walk you through the steps of creating a stunning Serinity Crystals Gold Briolette Beaded Bracelet. Combining the elegance of briolette beads with the richness of gold and seed beads, this bracelet is the perfect accessory for any fashionable occasion, including Christmas! So grab your beads, sit back, and let's get started!
Swarovski Crystals
By the way if you are an approved Swarovski customer, you can also use Swarovski Crystals for this project, they come in exactly the same shape, size and colour of beads and will substitute perfectly for Serinity Crystals. Bluestreak Crystals are one of very few remaining Swarovski Distribution Partners and can supply the entire range of Swarovski Crystals to businesses and professionals.
Component List:
The full list of Serinity Crystals, components and tools needed to complete this project can be found below. If you click on the product description (link), the respective product page will open, where each item can be viewed and added to cart:
|
Component
|
Component Name / Link
|
Quantity
|
 |
x 50 | |
 |
x 200 | |
 |
Beading Needles Size 12 | x 1 |
 |
Thread Cutters | x 1 |
 |
Thread of your choice | x 1 |
Instructions
Step 1
Prepare your thread
To guarantee a strong and long-lasting piece of beadwork it’s best to condition your thread before you begin. Do this by running the thread through the waxy substance of the Bead Buddy several times before you start. That waxy coating will guard against fraying and the risk of decay over time. You will even find the thread is easier to work with because it’s less likely to tangle.
Step 2
Create the primary loop
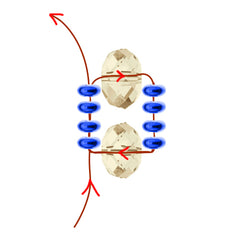
Thread your beading needle with a comfortable length of thread and begin by passing your needle through the following sequence of beads:
- 1 x briolette bead
- 4 x seed bead
- 1 x briolette bead
- 4 x seed bead
Leave a tail of thread sticking out of the end and then loop the thread back through everything a second time so that when you pull the thread taught it creates a beaded loop.
Step 3
Start building the pattern
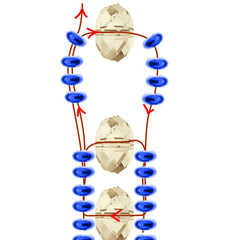
Now you can start building on top of the first loop to create a chain of loops. Do this by threading on:
- 4 x seed bead
- 1 x briolette bead
- 4 x seed bead
Then pass the thread back through the previous full loop and pull everything taught and finally back up though the seed beads on one side, ready to repeat the process.
Step 4
Build the full length of the bracelet
Repeat step 3 until the resulting chain of beads can wrap comfortably round your wrist with allowance to pull your hand through.
Step 5
Connect the two ends
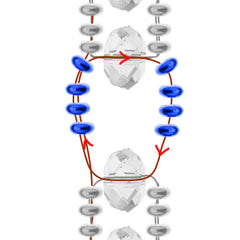
You will have two raw briolette bead ends and to connect the two together simply bridge the gap. Thread on 4 seed beads, pass the needle through the opposite briolette and add another 4 seed beads.
This completes the final loop and connects the two ends together and you’re now ready start building the second column of beadwork.
Tip: Don’t cut your thread, continue straight onto the next column.
Step 6
Begin the second column
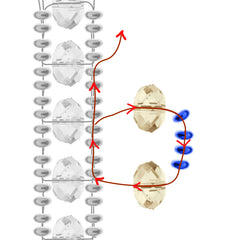
To begin the second column thread on:
- 1 x briolette bead
- 4 x seed bead
- 1 x briolette bead
Then loop back into the first column of beading and pass the needle through 8 seed beads. This completes the loop and brings the thread out one section up, ready to begin the next loop.
Step 7
Continue the second column
Continue building the second column by threading on:
- 1 x briolette bead
- 4 x seed bead
Then loop back through the previous briolette bead and pass the needle up through the next 8 seed beads. This completes the loop and brings the thread out one section up, ready to begin the next loop. Continue doing this until you have completed the second column.

Step 8
Finalise the Bracelet
Tie a knot close to the beads, ensuring it is secure without damaging the bracelet structure. Then secure the thread further by passing it through a few beads in the previous loop. Trim off any excess thread.
Step 9
Finishing Touches
Inspect your bracelet for any loose threads and trim away any tails. You may also want to apply a dab of clear nail polish or jewelry glue to the knots for added security.
Congratulations you have completed the project!
Congratulations on creating your very own Serinity Crystals Gold Briolette Beaded Bracelet! The combination of the enchanting briolette beads, the elegance of gold, and the precision of seed beads make this bracelet a perfect Christmas gift idea or a fashionable accessory to enhance your style. Get creative and experiment with different bead colours and patterns to add your personal touch! Whether you decide to keep it for yourself or gift it to a loved one, this bracelet will surely be cherished for its beauty and the love put into creating it. Happy beading!


