
Are you looking for a fun and stylish DIY project to add to your accessory collection? Look no further than this DIY Pearl Mini Handbag using Preciosa Pearls and Monofilament Illusion Cord Clear. Pearls have always been a timeless and elegant accessory, adding a touch of sophistication to any outfit. This DIY project allows you to create your own unique mini handbag that is sure to turn heads wherever you go. Or use the same beading techniques and create a unique evening bag.
Component List:
The full list of Preciosa pearls, components and tools needed to complete this project can be found below. If you click on the product description (link), the respective product page will open, where each item can be viewed and added to cart:
|
Component
|
Component Name / Link
|
Quantity
|
 |
1 x Wholesale pack | |
 |
1 x Wholesale pack | |
 |
1 x Wholesale pack | |
 |
1 x Wholesale pack | |
 |
Monofilament Illusion Cord Clear | x 1 |
 |
Side Cutters | x 1 |
Instructions
Step 1
Gather your supplies
Before you begin, make sure you have all the materials listed above. Lay out your pearls in the separate colours and with the side cutters, cut your illusion cord as long in length as you feel comfortable holding, I cut 50cm to begin with.
Step 2
Start threading the Pearls
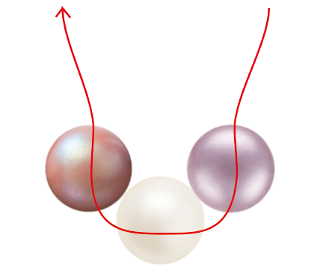
Start by threading three pearls at a time with the pattern you have in mind or follow the pictures for the existing pattern. Red symbolises the Clear Monofilament Illusion Cord, and the arrow represents which way to thread.
Step 3
Thread your stopper pearl
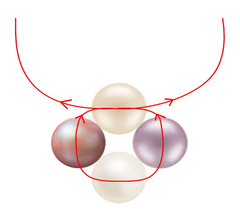
Thread your fourth pearl which will act as your stopper, and the end of a ‘group’. Thread both ends into opposing ends of the pearl hole and pull tightly as such.
Step 4
Continue threading ‘groups’
You can now begin by adding more ‘groups’ by repeating step 2, but now instead of threading three pearls, you will only thread two as you already have your middle bead. So therefore, you will thread one bead of the lavender on one thread and a pearlescent pink pearl on the other so both colours are inline with the colours before. Add your stopper from step 3 and continue to create more ‘groups’ until you reach the end of you line. For one row you will need a total of 11 groups. The more groups you create the wider your bag will be.
Step 5
Coming to the end of your row of 11 ‘groups’
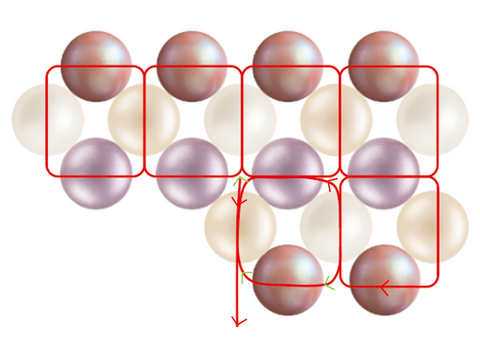
Once you have created 11 pearl groups, this has now formed a row, and you’re ready to create your 12th group which will be a corner. Thread two beads on your left thread (green arrows) instead of the one you have been doing before, and one on your right thread (red arrows) which will now act as the stopper. Thread your left thread through the bead on the right thread, through opposing threads like so.

Step 6
After attaching your corner group, we will begin a new row. On your left thread (previously right thread) thread two pearls again (red arrow) and the right thread (previously left thread) thread one pearl which will be the stopper as shown below.

Step 7
Continuing your new row of ‘groups’
After beginning your new row, you will want to continue this row for again 11 groups. However, unlike the first row, the threading is a little different as we’re attaching a new row onto an already existing one and not making it from scratch. To do this, with the red arrow cord, thread it through the existing lavender bead and with your green arrow cord, add three more pearls. The third bead will be your stopper so thread your red arrow cord thorough this third bead like so.
Step 8
Continue your rows and ‘groups’
Continue your ‘groups’ until you have 11 again, and then thread a corner as previously followed by the start of a new row. You want to have 4 rows in total for this size bag. Complete more ‘groups’ along with more rows for a bigger bag however you will need more pearls too if you wish to do this. Should you run out of cord at any point, simple tie on more cord to which ever end is short and continue, make sure this knot is secure and simply hide it by pulling the knot through a pearl.
Step 9
Joining your groups together to close the bag
Fold your panel of pearls in half and you want to thread through the holes of the rows above to connect the panel like you have previously been attaching your rows, adding a middle pearl each time using the techniques explained before (threads crossing over in the hole of the pearl). Pull your threads tight to secure it shut. Do this for the bottom of the bag too to shut it closed and tie off both your ends and slide the knot back through your last pearl.

Step 10
Thread a Handle
Thread a handle by placing 15 beads together in a row in a pattern of your choice or follow the existing pattern in the item picture and attach it to the bag by threading both ends. The more pearls you attach, the longer the handle. Tie off your ends again and slide it into your last pearl.
Congratulations you have completed the project!
Congratulations for being patient as this one is a labour of love! So why not give this DIY beaded pearl mini handbag project a try? It's a fun and creative way to spend an afternoon, and the result is a beautiful accessory that you'll be proud to show off. Change dimensions however you like for a bag of your wishes and maybe even change the pearls to beads, the technique will be the same! Happy crafting!


