
To bedazzle a coffee mug, you draw your design in a thin layer of resin glue, let it turn tacky, then fill it with flatback rhinestones placed one by one with a wax picker. In this tutorial we crystallise a printed initial on a ceramic mug using Serinity flatback crystals in Tanzanite, mixing SS16 and SS5 stones so the lettering stays crisp.
A monogram mug makes a lovely personalised gift, and the printed initial gives you a ready-made guide to follow, so it is a very forgiving first ceramic project. Here is everything you need, then the full method.
Project at a glance
- Difficulty: Beginner, the printed initial is your guide
- Time: About an hour per side, plus overnight curing per side
- Crystals used: Serinity flatback rhinestones in Tanzanite, SS16 and SS5
- Technique: Flatback lettering with resin glue and a wax picker
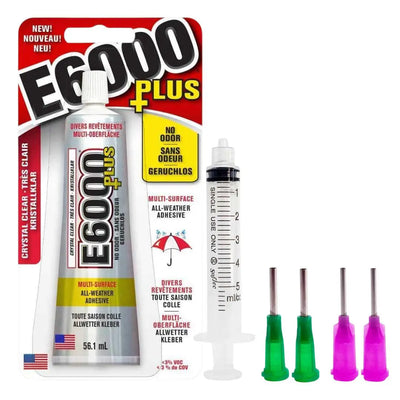
What you'll need
Quantities covered both initials on our mug, so scale to your design. Add the crystals, glue and tools to your cart from the cards below. The picker, tray and syringe are reusable across every project, so browse the full range of tools and accessories to build your kit.
- Your mug, clean and dryCeramic, ideally with a printed initial or design to trace1
- Serinity Rhinestones Non Hotfix SS16, TanzaniteMain fill for the lettering100
- Serinity Rhinestones Non Hotfix SS5, TanzaniteNarrow strokes and gaps200
- E6000 Plus Glue Kit (glue, syringe and fine tips)Bonding the crystals1
- Wax Crystal Picker ToolPicking and placing1
- Magic Sorting TrayHolding the two sizes while you work1
- Isopropyl alcohol (optional)Tidying glue edges before curing1
Shop this project
Everything you need for this build. Quantities are a guide, so adjust to your design.

From £2.12 Excl. VAT

£1.95 Excl. VAT

£5.12 Excl. VAT
£9.53 Excl. VAT
Not sure how many crystals you need? Use our Crystal Calculator to estimate by surface area.
How to bedazzle a coffee mug
Step 1: Clean the mug
Make sure the mug is completely clean, dry and free of grease so the glue can bond directly to the ceramic.
Step 2: Fill the glue syringe
Place the end of the syringe inside the nozzle of the E6000 Plus tube and pull the plunger while gently squeezing the tube. The glue transfers with minimal mess and minimal exposure to air. Only take as much as you need for the session.
Step 3: Remove air bubbles
Hold the syringe vertically so any air bubble floats to the opening at the top, then gently push the plunger until only glue remains inside. Attach the fine needle tip and the syringe is ready.
Step 4: Set your design guide
We used the outlines of the printed initial as our guide, keeping every crystal inside its edges. If your mug is plain, draw your letter on with a washable marker first, or print a letter, cut it out and trace around it.
Step 5: Apply the glue
Draw your design onto the ceramic in a thin layer of glue and leave it for 5 to 10 minutes to get tacky. Keep the layer thin: too much glue runs in unwanted directions on a curved surface. Work in small sections so you never touch wet glue while turning the mug.
Step 6: Place the crystals
Tip both sizes into the Magic Sorting Tray so the stones settle flat side down, then place each crystal with the Wax Crystal Picker Tool. Use the SS16 stones for the wide strokes and flex down to the SS5 stones wherever the lettering narrows, keeping the crystals close together with as few gaps as possible for the best effect.
Step 7: Tidy and cure
Clean up any stray glue at the edges with isopropyl alcohol, then leave the mug to dry overnight. Once safely cured, turn the mug over and repeat for the initial on the other side.
Frequently asked questions
How do you bedazzle a coffee mug?
Clean the mug thoroughly, draw your design in a thin layer of resin glue with a fine-tip syringe, let it turn tacky for 5 to 10 minutes, then place flatback crystals onto the glue with a wax picker tool. Tidy the edges, leave it to cure overnight, then turn the mug and repeat on the other side.
Is it safe to drink from a rhinestone mug?
Yes, as long as the crystals stay on the outside of the mug and well below the rim, away from where your lips touch. E6000 Plus is inert once fully cured, so a properly finished design poses no problem for everyday use.
Can you wash a bedazzled mug?
Hand wash only. Wash gently around the design with warm soapy water and avoid soaking. Skip the dishwasher, where prolonged heat and detergent weaken the glue bond, and avoid the microwave too, as the foil backing on the crystals is not microwave friendly.
How many rhinestones do I need for an initial mug?
Around 300 Serinity crystals covered both initials on our mug: 100 in SS16 for the main fill and 200 in SS5 for the narrow strokes and gaps. Letter size and font width change this a lot, so sketch your design first and use the Crystal Calculator on our website to estimate quantities by stone size.
What size rhinestones are best for lettering?
Use two sizes together. A medium stone such as SS16 fills the wide strokes quickly, while a small stone such as SS5 handles narrow strokes, curves and the gaps the bigger stones cannot reach. Flexing between sizes as the letter width changes is what keeps the edges crisp.
Make it your own
Tanzanite is a rich violet, but any shade works: match a kitchen colour, a birthstone, or do each family member's initial in their favourite colour. For more drinkware makes, see how to bedazzle Mr & Mrs mugs and a water bottle, or explore the full Craft Studio.


