Your Cart is Empty

Preciosa Pearls Cluster Drop Earrings Jewellery Project

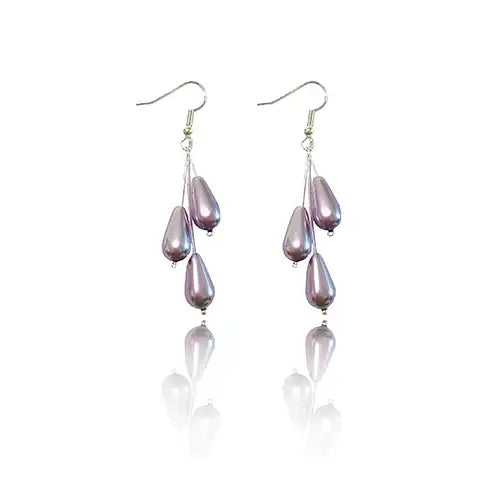
If you love elegant and classy jewellery, then this DIY project is perfect for you! In this guide, you will learn how to create beautiful pearl cluster drop earrings using Preciosa Pearls and silver-plated findings along with some jewellery pliers. These earrings are perfect for a special occasions or everyday wear, and they make a wonderful handmade gift for friends and family. With imagination this base design can be turned into your very own.
Component List:
The full list of Preciosa pearls, components and tools needed to complete this project can be found below. If you click on the product description (link), the respective product page will open, where each item can be viewed and added to cart:
| Component Image | Component Name / Link To Purchase | Component Quantity |
 |
Preciosa Pearls Pear 15x8mm Lavender | x 6 |
 |
Silver Plated Crimp Beads | x 6 |
 |
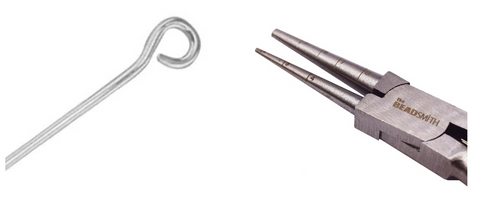
Silver Plated 2” Flat End Headpins | x 6 |
 |
Silver Plated Fish Hook Ear Wires | x 2 |
 |
Side Cutters | x 1 |
 |
Loop Pliers | x 1 |
Instructions
Step 1
Gather your supplies
Before you begin, make sure you have all the materials listed above. Lay out your pearls, beads and findings on a beading mat or soft towel so they are easily accessible and won’t roll away. Make sure you have the appropriate pliers too.
Step 2
Thread the pearls and crimp beads
Start by threading a crimp bead on each flat end headpin so it sits at the bottom with the flat end facing downwards and pin facing upwards. Proceed to then place each of your pear pearls on top of the crimp beads onto the headpin. Each headpin should now have a crimp bead at the bottom and a pear pearl on top.
Step 3
Trim the headpins
Leaving the first two headpins alone and using the side cutters, trim each pair of headpins to matching lengths, going slightly shorter each time. You should have a pair of the 2” normal length headpins, followed by a pair of slightly shorter and another pair being the shortest. I trimmed by 1.5cm each time but you can play with your desired lengths.
Step 4
Secure the pearls in place with loops
Next, you will want to use your loop pliers to loop each top of headpin closed. This will secure the pearls in place. Repeat this process for all 6 strands.
STEP 5
Attach the ear wires
Once you have created your pearl clusters, attach them to the silver-plated fishhook ear wires. Open the loop at the bottom of the ear wire using your pliers, slide on three pearl clusters varying the lengths, and then close the loop securely. Each cluster should have one of each length headpin, with the longest in the middle and two shorter on either side.
STEP 6
Finishing touches
After attaching the pearl clusters to the ear wires, check that they are securely fastened. Adjust the pearls as necessary to ensure they hang evenly, and the headpins don’t have any unwanted bends.
Congratulations you have completed the project!
Congratulations, you have successfully made your own DIY pearl cluster drop earrings using Preciosa Pearls and silver-plated findings. Put on your new earrings and show off your beautiful, handcrafted jewellery to the world! Creating your own jewellery is a fun and rewarding experience, and these pearl cluster drop earrings are sure to impress. Experiment with different pearl sizes and colours to customize your earrings to suit your style. Enjoy wearing your handmade jewellery or gift them to someone special – either way, they are sure to be a hit!