
If you love Disney's The Little Mermaid and everything Barbie, crystallising an Ariel mermaid doll is the ultimate fan craft. This guide shows you how to rhinestone a mermaid doll using Preciosa flatback crystals in five AB shades, blended in a gradual ombre that mimics the iridescent CGI scales of her famous tail.
Full coverage takes patience, but the scatter ombre technique is forgiving and the finished doll is a real showpiece. Hundreds of tiny AB coated crystals catch the light from every angle, so the tail shifts colour as it moves. Here is everything you need, then the full method.
Project at a glance
- Difficulty: Intermediate, full coverage takes patience but no special skills
- Time: A few hours of placing, plus drying time
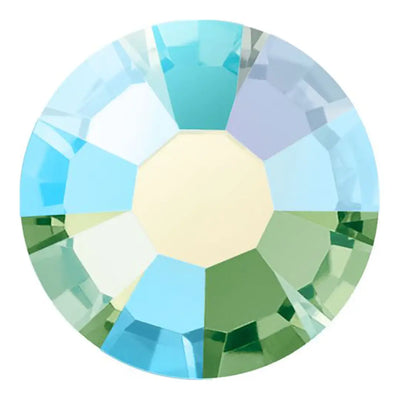
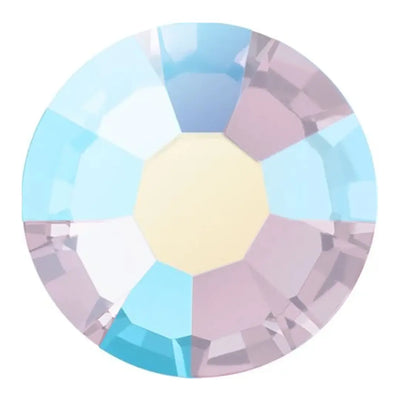
- Crystals used: Preciosa flatback AB crystals in Caribbean Sea, Peridot, Chrysolite Opal, Pale Lilac and Light Amethyst, in SS5 and SS12
- Technique: Scatter ombre flatback embellishment with resin glue
What you'll need
Quantities gave full coverage of the tail and bodice shown, so scale to your doll. Add the crystals and glue to your cart from the cards below. The picker, tray and syringe are reusable across every project, so browse the full range of tools and accessories to build your kit.
- Your own mermaid doll, clean and dryYour base; lightly sand shiny plastic for full coverage1
- Preciosa Non-Hotfix Flatbacks, Caribbean Sea AB (SS5 and SS12)Deep sea blue band300 each
- Preciosa Non-Hotfix Flatbacks, Peridot AB (SS5 and SS12)Green blend300 each
- Preciosa Non-Hotfix Flatbacks, Chrysolite Opal AB (SS5 and SS12)Soft green opal blend300 each
- Preciosa Non-Hotfix Flatbacks, Pale Lilac AB (SS5 and SS12)Lilac transition300 each
- Preciosa Non-Hotfix Flatbacks, Light Amethyst AB (SS5 and SS12)Purple tail tip300 each
- E6000 Plus Glue KitBonding the crystals, dries clear1
- Wax Crystal Picker ToolPicking and placing1
- Magic Sorting TrayHolding the five colours1
Shop this project
Everything you need for this build. Quantities are a guide, so adjust to your design.


From £4.31 Excl. VAT

From £4.31 Excl. VAT
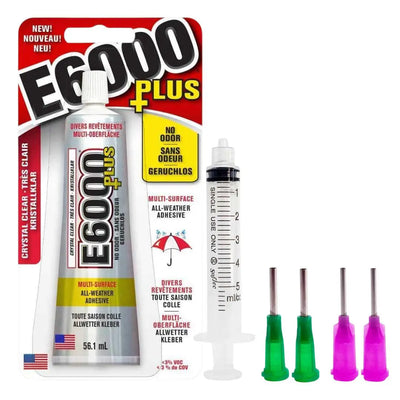
£9.53 Excl. VAT

£1.95 Excl. VAT

£5.12 Excl. VAT
Not sure how many crystals you need? Use our Crystal Calculator to estimate by surface area.
How to rhinestone a mermaid doll
Step 1: Prepare the doll
Make sure the doll is completely clean and dry. If the plastic is shiny and you are going for full solid coverage, gently sand the tail until there is a rough key for the glue to grip. Sanding is unnecessary for scattered crystals or surfaces that already have texture.
Step 2: Fill the glue syringe
Place the end of the syringe inside the nozzle of the E6000 Plus tube and pull the plunger while gently squeezing the tube. The glue transfers with minimal mess and minimal exposure to air. Only take as much as you need for the session.
Step 3: Remove air bubbles
Hold the syringe vertically so any air bubble floats to the opening at the top, then gently push the plunger until only glue remains inside. Attach a fine needle tip; we used the 16 gauge purple applicator tip for a smaller, more precise dot of glue.
Step 4: Apply a thin layer of glue
Squeeze a thin layer of glue onto the doll and leave it a minute or two to get tacky. Do not apply too much, or it will run on the curved surface. Work in small sections on a three-dimensional object so you never touch wet glue while turning the doll.
Step 5: Place the crystals in an ombre
Place each crystal with the wax picker tool, working the five colours in bands that blend into one another: deep Caribbean Sea blue through Peridot and Chrysolite Opal green, into Pale Lilac and Light Amethyst at the tip. Mix SS5 and SS12 within each band and let the colours overlap at the edges so the gradient looks natural. For more on blends and other layouts, see our ultimate guide to rhinestone embellishment.

Step 6: Let the glue dry
Tidy up any drifting glue, then let the doll dry for at least 2 hours; drying time varies with how thickly the glue went on. Once dry, your crystallised mermaid is ready to display.
Frequently asked questions
How do you rhinestone a mermaid doll?
Clean the doll and lightly sand shiny plastic for full coverage, then pipe a thin layer of resin glue, let it turn tacky, and place flatback crystals with a wax picker tool. Work the colours in blended bands for an ombre tail, in small sections, and leave it to dry for at least two hours.
How many crystals do you need to cover a mermaid doll?
Full coverage of the tail shown took around 3,000 Preciosa flatbacks: 300 each of five AB colours in both SS5 and SS12. Doll size and how much you cover change this a lot, so use the Crystal Calculator on our website to estimate quantities by area before you buy.
What glue works best on a plastic doll?
A flexible industrial-strength resin glue such as E6000 Plus. Apply it in thin layers through a fine syringe tip so it cannot run on the curved surface, and sand shiny plastic first for grip. Allow at least two hours to dry, longer if the glue went on thickly, for a bond that lasts.
How do you create an ombre effect with rhinestones?
Choose three to five shades that sit next to each other, then place them in bands that overlap at the edges rather than meeting in hard lines. Scattering a few crystals of the next colour into each band blends the joins, and mixing two sizes fills gaps so the gradient reads as smooth.
What does AB mean on a crystal?
AB stands for Aurora Borealis, a fine iridescent coating on one side of the crystal that throws off a rainbow shimmer as it catches the light. On genuine Czech-made Preciosa flatbacks it gives the mermaid tail the colour-shifting, scale-like finish that plain crystals cannot.
Can I use different colours or a different doll?
Yes. The same scatter ombre method works on any doll or figurine, and Preciosa AB flatbacks come in a wide colour range, so you can match any character. Swap the sea-to-purple blend for warm corals and golds, or icy blues and whites, to suit the look you are recreating.
Make it your own
Once you have the ombre technique, it works on almost any figure. Try a single jewel-tone fade, a metallic scale effect, or pick out a crown or bodice in a contrast colour. For more coverage makes, see how to crystallise a Faberge-style egg, or explore the full Craft Studio.


