Your Cart is Empty

Preciosa Crystals Brooch Jewellery Making Project

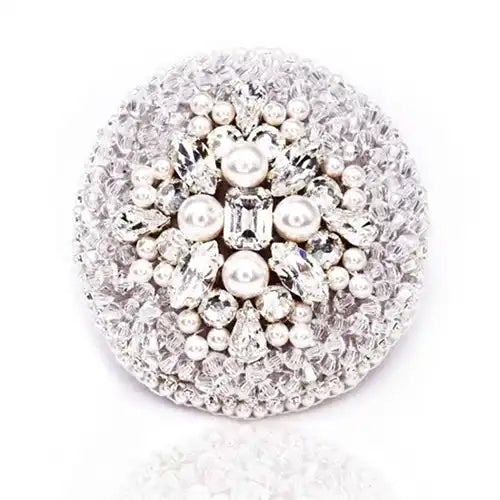
Preciosa Crystal Brooch
Follow the instructions below to make this fabulous Crystal Brooch with Preciosa Crystals, your friends and family are sure to be impressed by such a lovingly handmade accessory and we encourage you to have fun and experiment with crystal combinations to craft a design that perfects suits your personal taste.
Component List:
The full list of Preciosa crystals, components and tools needed to complete this project can be found below. If you click on the product description (link), the respective product page will open, where each item can be viewed and added to cart:
| Component Image | Component Name / Link To Purchase | Component Quantity |
 |
Preciosa Navette Single Stone Silver Setting 6mm | x 4 |
 |
Preciosa Octagon Single Stone Silver Setting 8mm | x 1 |
 |
Preciosa Pear Single Stone Silver Setting 8mm | x 4 |
 |
Preciosa Chaton Rose Single Stone Setting Silver SS20 | x 8 |
 |
Preciosa Pearls 4mm White | x 24 |
|
Preciosa Pearls 5mm White | x 4 |
 |
Preciosa Bicone Beads 3mm Crystal | x 1000 |
 |
Preciosa Crystal Cup Chain Silver SS4 | 25cm |
 |
Silver Plated Brooch Pin | x 1 |
 |
Gem Tac Glue | x 1 |
 |
Beading Needles | x 1 |
 |
Felt Fabric & Matching Thread | x 1 |
Instructions
Step 1
First ensure the Felt for your brooch is secured in an embroidery hoop as this will make controlling the positioning of your Preciosa crystals while sewing easier. Measure to find the central point and mark it with a dot. Let there be a margin of at least 3cm of fabric around the outer edge of what will become your brooch, as this gives you room to work and the excess can be trimmed off later.
Step 2
Place the Single Stone Settings onto the Felt, starting from the centre and use Gem-Tac to temporarily glue them in place, this will prevent them from shifting out of position while sewing.
Step 3
Using your Needle, thread the Single Stone Settings firmly into place, making sure to stitch through every available hole for maximum security.
Step 4
Once your central stones are secure, begin sewing down the surrounding Pearls and Beads, building outwards from the centre. Try to cover the fabric as thoroughly as possible leaving little to no gaps.
Step 5
Before you reach the outer edge of your design, position the Crystal Cup chain so that it sits along the outline and glue and stitch it securely into place.
Step 6
Fill in the remaining space with the rest of your beads until you have reached the cup chain on all sides.
Step 7
Remove your Felt from the embroidery hoop and trim away the excess fabric. Be careful to not cut through any of the stitches holding the Cup chain in place.
Step 8
Sew the Brooch Pin onto the back of your brooch, roughly 1 – 2cm down from the upper edge of the design. This will prevent the brooch from being top heavy and tipping over when worn.