
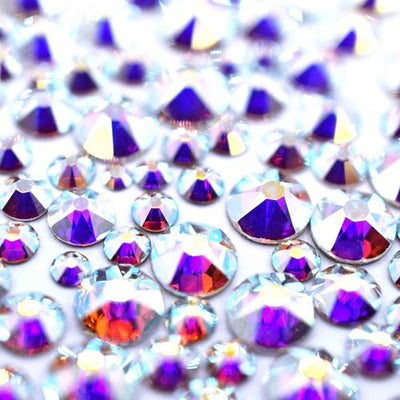
Your passport holder is one thing you always have with you when you travel, so why not make it a glamorous accessory you are proud to show at the gate? This guide shows you how to rhinestone a passport holder using Serinity flatback crystals in a Crystal AB size mix, scattered for full sparkle across both sides.
A size mix is the secret to a clean scatter: the different sizes nestle together and fill the gaps, so the cover looks solid rather than gappy. Crystal AB adds a rainbow shimmer that shifts as you move. The method is simple, glue in sections and place as you go, with both sides done in turn. Here is everything you need, then the full steps.
Project at a glance
- Difficulty: Beginner to intermediate, a simple scatter over two sides
- Time: A couple of hours, plus overnight drying per side
- Crystals used: Serinity non-hotfix flatbacks, Crystal AB size mix
- Technique: Tight scatter flatback embellishment with resin glue
What you'll need
A Crystal AB size mix covers a passport holder beautifully, as the varied sizes fill the gaps. Scale the number of packs to how densely you cover yours. Add the crystals and glue to your cart from the cards below. The syringe, picker and tray are reusable across every project, so browse the full range of tools and accessories to build your kit.
- Your own passport holder, clean and dryYour base; faux leather grips glue well1
- Serinity Non-Hotfix Crystal AB, Size MixScatter coverage; sizes fill the gaps2-3 packs
- Sandpaper, 120 grit or higherKeying a shiny finish (skip on textured faux leather)1
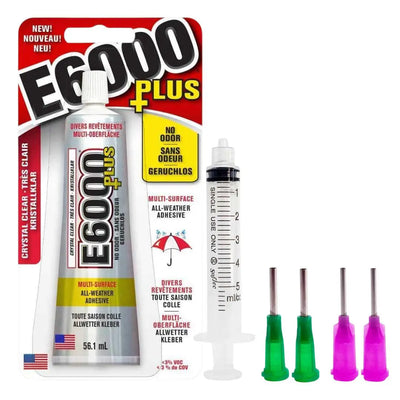
- E6000 Plus GlueBonding the crystals, dries clear1
- Crystal FX SyringeApplying thin, controlled glue1
- Wax Crystal Picker ToolPicking and placing1
- Magic Sorting TrayHolding the size mix while you work1
Shop this project
Everything you need for this build. Quantities are a guide, so adjust to your design.

£1.95 Excl. VAT

£5.12 Excl. VAT
£9.53 Excl. VAT
Not sure how many crystals you need? Use our Crystal Calculator to estimate by surface area.
How to rhinestone a passport holder
Step 1: Prepare the surface
Make sure the holder is clean. If the case is shiny, gently buff it with sandpaper until the surface is matt, which gives the glue a key to grip. If your holder has a faux leather finish, its texture is usually enough on its own, so you can skip sanding.
Step 2: Apply the glue
Part fill the Crystal FX syringe with E6000 Plus and cover a small section of the holder with a thin layer. Leave it about 10 minutes to turn tacky. Each glued section gives you roughly an hour of working time and takes 24 hours to cure fully.
Step 3: Place the crystals
Tip the size mix into the Magic Sorting Tray and place the crystals with the wax picker tool in a tight scatter. When filling a shape, start with the outline and work inwards, mixing the sizes so they nestle together and leave as few gaps as possible.
Step 4: Work across, then do the other side
Continue across the first side until you reach the spine, then let the glue set fully before flipping the holder over to do the back. Leaving it to dry overnight stops you knocking crystals out of place while the glue is still soft.
Step 5: Clean up
Once everything is fully dry, wipe the crystals with a cloth or tissue to remove any waxy residue left by the picker tool, so they sparkle at their brightest.
Frequently asked questions
How do you rhinestone a passport holder?
Clean the holder and buff shiny surfaces to a key, then pipe a thin layer of resin glue over a small section, let it turn tacky, and place flatback crystals in a tight scatter with a wax picker tool. Work outline first, do one side and let it set, then flip and cover the back.
How many crystals do you need to cover a passport holder?
Full, dense coverage of both sides can take around 3,000 size-mix crystals, while a lighter scatter or a single side needs far fewer, often just one pack. Coverage varies with holder size, so use the Crystal Calculator on our website to estimate quantities by area before you buy.
What glue works best for crystals on a passport holder?
A flexible, clear-drying resin glue such as E6000 Plus, which moves with the case as it flexes. Buff shiny plastic first so the glue grips; textured faux leather usually needs no sanding. Apply thin layers through a fine syringe tip and let it cure for 24 hours before use.
Why use a size mix instead of one size?
A size mix gives a cleaner scatter on a flat surface. The larger crystals set the spacing while the smaller ones drop into the gaps between them, so the cover reads as solid sparkle rather than a gappy grid. It also saves you sorting and switching between separate size packs.
What is Crystal AB?
AB stands for Aurora Borealis, an iridescent coating that gives clear crystal a rainbow shimmer which shifts as the light moves. On genuine Serinity flatbacks, our own Austrian-made brand, it makes a passport holder catch the light from every angle for real wow factor.
Will the crystals survive being packed and handled?
Yes, once the E6000 Plus has fully cured. It dries flexible and tough, so it copes with the holder bending in a bag. Faux leather grips especially well. Avoid heavy abrasion, and pack the holder where it will not be crushed against zips or hard edges, just to be safe.
Make it your own
A full Crystal AB scatter is timeless, but you could pick out initials, a flag or a heart in a contrast colour, or fade two shades across the cover. The same method works on luggage tags and card holders too. For more accessory makes, see how to bedazzle a phone case or a pair of sunglasses, or explore the full Craft Studio.


