Your Cart is Empty

Crystalise Converse Trainers with Swarovski Flatback Crystals

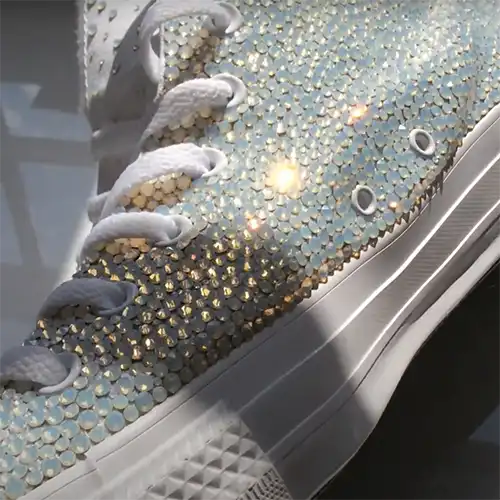
Whether you're a seasoned DIY enthusiast or a crafting novice, adding a sprinkle of sparkle to your everyday look can be both fun and rewarding. One trend that has caught the fashion world by storm is crystallised Converse trainers, and what better way to achieve this look than by using Swarovski flatback crystals? Below, we'll guide you through the steps to transform your favourite pair of trainers into a dazzling fashion statement.
DIY Swarovski crystals converse: what you'll need:
- A pair of Converse trainers
- Swarovski Flatback Crystals: The size and quantity will depend on your design, but sizes SS20 (4.7mm) or SS16 (3.9mm) are commonly used.
- Strong adhesive suitable for fabric and crystals, such as E6000.
- Precision applicator or toothpicks for applying the adhesive.
- Tweezers or a wand tool for picking up and placing crystals.
- Wax paper or a clean work surface
How to attach Swarovski crystals to converse: step-by-step guide
Step 1: Clean your converse
Before beginning, ensure your Converse trainers are clean and dry. Any dust or dirt can impede the adhesive's ability to bond with the fabric, potentially compromising the longevity of your design.
Step 2: Plan your design
Sketch out your desired design on a piece of paper. This will help you envision the final product and determine the amount of Swarovski crystals needed. You can opt for an intricate design covering the entire shoe or a minimalist approach with crystals highlighting specific areas.
Step 3: Prepare the workspace
Lay down wax paper to protect your workspace from any potential adhesive spills. Gather all your materials within reach. This setup facilitates a smooth working process and helps prevent misplacement of crystals or tools.
Step 4: Apply the adhesive
Using your precision applicator or toothpick, apply a small amount of adhesive to the spot where you want your first crystal. A small dot is typically enough — remember, the goal is to adhere the crystal, not to soak the fabric in glue.
Step 5: Position the crystal
Pick up a Swarovski flatback crystal using tweezers or a Crystal Katana tool. Carefully place it on the glue dot. Press lightly to ensure the crystal adheres properly.
Step 6: Repeat
Continue the process, applying adhesive and placing crystals until your design comes to life. Be patient; this can be a time-consuming process, but the end result will be worth it.
Step 7: Allow to Dry
Once all the crystals are in place, let your trainers dry for at least 24 hours. This ensures the glue has completely set and your crystals are firmly attached.
Watch our rhinestone embellishment tutorial
We have created a tutorial which shows how you can glue on Swarovski Flatback Crystals to your Converse Trainers:
Should I use Non-Hotfix or Hotfix Crystals for converse?
When it comes to choosing between Non-Hotfix and Hotfix Swarovski crystals, everything largely depends on your preference and the tools you have at hand. Both types of crystals can be used effectively to adorn your Converse trainers, but there are a few differences to consider.
Swarovski hotfix crystal flatbacks are equipped with a heat-activated adhesive on the back. When heat is applied, the glue melts and bonds with the fabric. To attach Hotfix crystals, you need a Hotfix applicator or an iron. The advantage of using Hotfix crystals is that the heat-activated adhesive is usually stronger than standard glue. However, because Converse trainers are made of canvas, a material that can scorch under high heat, using Hotfix crystals might pose a risk of damaging your shoes.
Swarovski flat back crystals (non-hotfix), on the other hand, require an adhesive to stick to the fabric. The advantage here is that you have control over the amount of glue used, and you can avoid potential heat damage to your shoes. E6000 adhesive is often recommended for this task due to its strength and flexibility. It also dries clear, ensuring your design isn't marred by visible glue.
For Converse trainers, using Non-Hotfix crystals with a strong adhesive might be the safer and more convenient choice, especially for DIY beginners. This method is less likely to damage the shoe fabric and doesn't require special tools apart from the adhesive and a tool to pick and place the crystals. Regardless of the method you choose, the key is patience and precision to create a lasting, beautiful design.
Check out our most popular Swarovski Flatback Rhinestones Crystals
